Showing posts with label Recipe Time. Show all posts

Wednesday, March 8, 2017

Sweet Strawberry Tallcake


I love strawberry shortcake in the summer. Homemade, fluffy white cake with fresh strawberries and puffy whipped cream...I would have made exactly that aside from the fact that I didn't have any heavy whipping cream. 
Plus I wanted something...sweeter. Something sweet enough to take away the winter blues.
If strawberry shortcake is good, strawberry tallcake would be better!
I started with a basic white cake mix. I flubbed separating one of the egg whites so about half a yolk did enter the batter. No problem, it still tasted heavenly. ;) If you're in need, I recommend this one found on King Arthur Flour's website: http://www.kingarthurflour.com/recipes/tender-white-cake-recipe


I baked this cake in two 8" round cake pans, sprayed with baking spray. I tried using avocado oil spray for a couple of cakes over the summer and will never make that mistake again. If I'm going for a rich, sweet, cake, I'm going all the way with fat content!
Once cooled, I spread a layer of all-natural strawberry preserves on top of the bottom layer and then placed the upper layer firmly on top. 
I made a light buttercream frosting from 4 cups of confectioners sugar, 1/4 cup of whole milk, 1.5 sticks of salted sweet cream butter, 1 tsp of vanilla extract and mix. I whipped the butter with a fork first...I just always do this and I'm going to show just how lazy I am but for a small batch of buttercream I prefer to use the hand-held mixer or a fork and some elbow grease. 

I only put the buttercream on the top of the cake. I didn't wait until the cake was cool enough which is why it is not pictured as a whole cake! ;) So, lesson learned, I will be more patient next time.
It still tasted delicious though and looked mighty pretty when garnished with some fresh, sweet strawberries.

You can kind of see that sloppy cake top in the background...oops! Shhh! :)


Monday, January 16, 2017

Recipe Time: Mini Tot Casserole!

Trying to keep this recipe short - because it's really one of the easiest, fastest meals I've prepared for my family in quite some time. Also because Mr. Nearly Four has stopped napping and "quiet time" only lasts so long.
I am a casserole-craving fanatic, and my husband has a thing about "mixing textures" - that is to say, he generally doesn't enjoy casseroles. My attempt at Tex-Mex Chicken Casserole? I loved, his plate was untouched. I have been on a journey to find a casserole that is the perfect marriage of our food tastes and so far, this one takes the cake  casserole.

When I saw these cute mini tater tots in the frozen food aisle (and they were on sale) my memory brought me back to a simpler time of binge watching TLC on a Sunday afternoon, with wide eyes as wholesome Duggar gals wearing smocked floral dressed shared their favorite meal to serve sixteen at the time - the famous Tater Tot Casserole. It looked so good on TV, but alas, in all my casserole indulging, I had yet to try it myself.
On a night when I had a pound of thawed grass-fed beef in the fridge and that glorious bag of mini tots in the freezer, it happened - the mini tot casserole was born. Cue the choirs singing heavenly! A little dramatic, but here it is: a 13x9 pan of deliciousness that your picky husband *might* possibly (no promises) like. Try it. Tell me how it goes! ;)

You'll need:
-1 pound of ground beef (I used a package of grass-fed, 85% lean)
-1 package of condensed cream of chicken soup (I used Pacific brand)
-5 oz sour cream
-a heaping handful of fried onions - so naughty, I know. Don't fret, you could just use a finely chopped onion in place of these, but I had exactly this much left over from Christmas dinner's green bean casserole and couldn't resist the salty goodness
-1 tsp paprika
-1/2 tsp freshly ground parsley
-1 tsp black pepper
-1 tsp garlic powder
-1/2 cup sharp yellow cheddar cheese, shredded
-1 cup sharpe white cheddar cheese, shredded
-1 cup cheddar cheese, shredded
-1 bag of frozen mini tater tots (I used Ore-Ida, I'm not sure if other brands make the minis!)
-sour cream, fresh tomatoes, salsa, shredded lettuce, avocado as toppings (your choice/preference)
Step one: cook the ground beef until no longer pink, you'll want it broken into small bits as shown, sorry I don't have a picture of the beef by itself, I only realized it would make a good blog post at this point with everything in the pot already, lol!
Step two: add the other ingredients, but reserve the tots and 2 cups of shredded sharp white and cheddar cheese. Stir until everything is mixed together. 
It will look like this, and you will be tempted to sample it straight from the pot! ;)
Step three: pour the tots into your 9x13 (13x9??) pan, mine was glass. I didn't need to coat it first, because greasy foods lol, but you may want to give it a quick spray of avocado oil if you don't enjoy living as dangerously as yours truly. 

Step four: pour the mixture on top of the tots and spread evenly, covering each of those yummy tots!
Step five: sprinkle the reserved shredded cheeses on top!
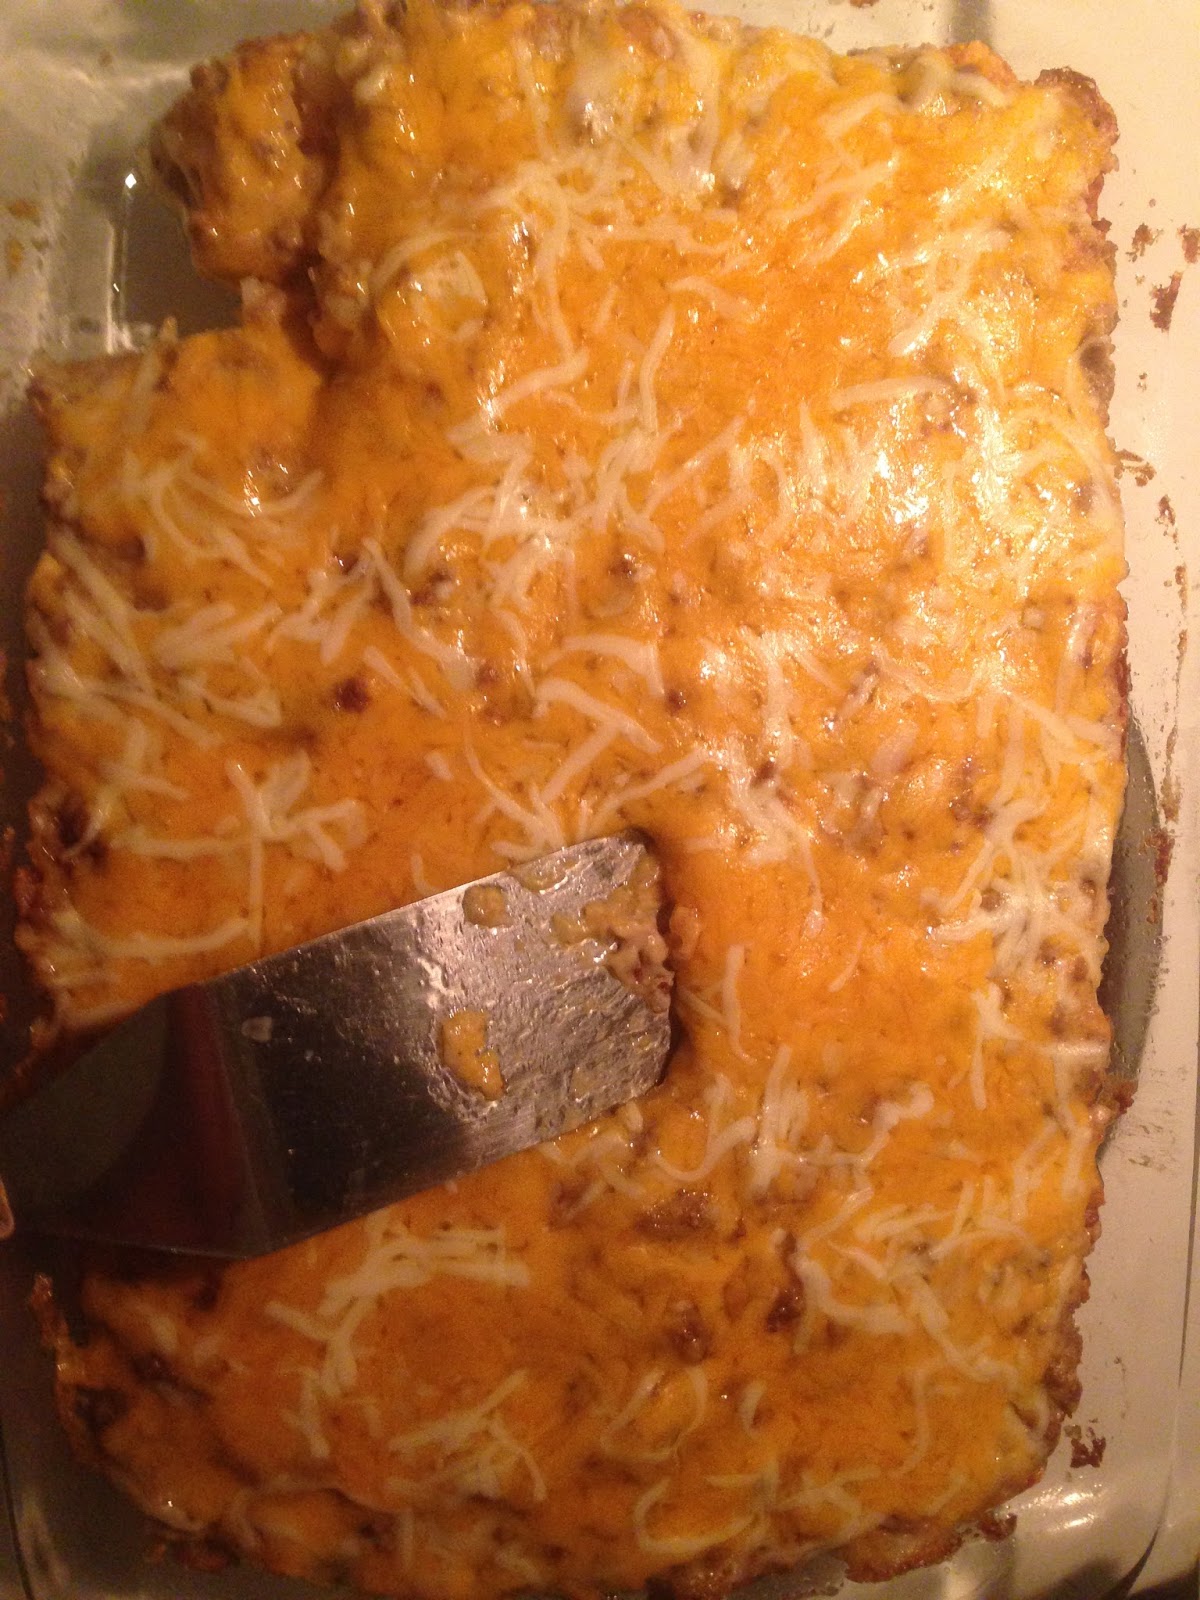
Final step: bake at 350 degrees for about 30 minutes or until the tots on the bottom are golden and your cheese is gooey and melted (as shown)
And then of course: serve!! I couldn't help but portion some to try before I even took a picture.
I plated my husbands plain, with some steamed baby carrots in a light butter glaze.
He TOLERATED it! And gave me the go-ahead to make it AGAIN. Casserole winning in his book.
For the boys I plated it with the carrots, strawberries, a dollup(?) of sour cream, shredded lettuce and extra shredded cheddar on the side. They loved everything! I find that plating things in the separated re-play plates does help them to try new foods. I always keep their trusted faves separate and untainted, and the more adventurous foods are like a trail leading to the new menu item. 
For myself, I topped the casserole with some shredded lettuce and sour cream.
And yes, it was tater-tot-tastic.


Tuesday, December 6, 2016

Gluten Free Chicken Lo Mein


It's been a while since I posted, and this was a recipe that I had meant to share a loooong time ago.
Near the beginning of the school year, I made it a goal to stick to the following schedule for the first four days of my meal planning week, and then I could let myself "slack off" and make frozen pizza, leftovers, or take out for the rest of the week. My hope was that if I planned well - and stuck to the plan - maybe I would surprise myself and actually start to enjoy cooking for my family of picky eaters once again.
The plan was:
-Sunday Dinner: an extravagant, multi-course meal such as soup, salad, roasted chicken, au gratin potatoes and apple crisp. Something to really celebrate our day of 'rest' :)
-Meatless Mondays: there has been a lot of research that has convinced me of the health benefit to this, and our budget could certainly use it!
-Taco Tuesdays: tacos or Tex-Mex/Spanish inspired cuisine. This usually ends up being a crock pot meal, which I love! My recipes for "Tex-Mex Crockin' Chicken" and "Two Can Taco Chili" (which tastes EXACTLY like Wendy's chili but is wayyy healthier) will be soon to post IF I can maintain my ambitious streak!
-Wok Wednesdays: *insert angelic choir here* yes!! This is what I've been ranting about. A healthy stir fry, and cuisine that boasts an Asian flair! My family LOVES Chinese take-out. My husband is a chicken and broccoli with garlic sauce kind of guy, and my kids gravitate toward the deep fried sweet and sour chicken with white rice. But I'm a lo mein lover! So, when I found some gluten-free rice noodles on sale through Amazon Prime Pantry, I decided to implement them in this week's "Wok Wednesday"
*Side note: I do not have a WOK. As mentioned earlier, there is no budget for a wok. If anyone would like to buy me a wok, I would respond "YOU ROCK, THANKS FOR THE WOK!" (I would yell it in all caps because I'm anti-social and live online). But alas, pots and pans will be used for this recipe. Feel free to adjust to use your wok, if you have one. Wok, wok, wok! Okay, I'm done.
Anyway...Here's the recipe. Let me know how it works out for you...and if your picky (or not-so-picky) eaters like it, too!

Ingredients:
-one box of stir fry rice noodles, prepared according to package
-1/4 cup of soy sauce
-1/4 cup of teriyaki sauce
-3 tbsp white vinegar
-1 tbsp sugar
-1 tbsp honey
-1 cup of corn starch in a zip top bag
-1/2 lb chicken breasts, trimmed and sliced thin
-black pepper and garlic to taste
-several pinches of salt
-avocado oil (I used the spray-on type)
-steamed broccoli and carrots
-about three scallions, sliced, with one reserved for garnish


Step one: Prepare the chicken. While the noodles are cooking, shake the trimmed and sliced chicken in a bag of corn starch to coat. Place into a non-stick pan (or one sprayed with avocado oil, as shown) over medium heat. Salt and pepper each side to taste. Remove from pan and set aside when cooked through.


Step two: Lightly warm two of the sliced scallions in a pan of avocado oil over medium heat.


 Step three: Cut the chicken breasts into slightly smaller chunks and add into the pan with the soy sauce, sugar, honey, teriyaki, and garlic.


Step four: Add the white wine and simmer until slightly thick. Tip: add a quick sprinkle of corn starch to the sauce after adding the chicken to the noodles, if needed.


Finally, combine the chicken in the delicious sauce with the noodles and veggies.


Mix with tongs until coated.


Plate without fresh scallions for your picky eaters!


Plate with beautiful fresh scallions (and sesame seeds, if desired) for everyone else.


Yum, enjoy!!
-Sarah

Friday, October 28, 2016

Homemade, Allergy Friendly, Almond Butter Halloween Treats


Call me basic, but I'm a huge fan of normal, everyday things turning into pumpkins every autumn.
If anyone were to ask me what my favorite Halloween candy is, I would tell them, hand's down, it's a Reese's Peanut Butter Pumpkin. Probably my favorite candy of all time, and made only better by the festive, jack-o-lantern shape, I never thought that I would see the day that these scrumptious treats weren't the staple of my trick-or-treat basket.

However, for anyone affected by several different allergen sensitivities and allergies, a Reese's pumpkin isn't even an option. That's why when I happened to pull out my handy dandy Jell-O mold knowing that there would be no Jell-O made due to my son's food dye sensitivities, I put on my thinking cap and realized we could make our own spooky treats, homemade and tailored to avoid any allergens or less-than-desirable ingredients!

I'm a huge fan of both sunflower seed butter and almond butter. Both are delectable when spread on just about anything. However, I was out of the first so I used the latter. The brand I used was Maranatha but you could use any brand or nut/seed butter that suits your needs - either for preference or allergen-related.


For the trial run, I used good old-fashioned Hershey's snack-sized chocolate. Why? Well, I don't usually happen to have Hershey's chocolate hanging about the house. It was leftover from our camping trip (s'mores!) and I was out of my typical favorite chocolate brand, Equal Exchange. If you haven't figured it out by now, I was pretty much low on ingredients in general and was procrastinating a trip to the grocery store.

But y'all - you don't need much for ingredients or time to whip up these babies!

Just about 4 cups of the chocolate of your choice, either in chips or small chunks. And about a teaspoon of your nut or seed butter for each of your molds. You could use any mold, too. These just happened to be what I had available and they are perfect for Halloween!


To melt the chocolate, I put it all in a glass Pyrex bowl and microwaved it for 30 seconds. The double-boiler method just isn't my style, but if it's yours - go for it. ;)

I stirred the chocolate and popped it back in for another 30 seconds before stirring again.

I spooned enough chocolate into each mold to fill each about halfway, and then dropped a teaspoon of almond butter on top. Then I just covered the rest with chocolate to the top.


I covered the top of the mold with Press'n'Seal and let it rest in the fridge for about 2 hours.


They popped out perfectly and tasted even BETTER than my beloved Reese's peanut butter pumpkins.

These can be made gluten free, nut free, even dairy free. It's a very versatile treat and I know I will be making these again and packaging them so any trick-or-treaters who make the trek to my remote location will be in for a yummy (and safe) surprise.


Happy October, everyone!
~Sarah